 Jewelry that is both attractive and inexpensive will always sell really well at craft shows and fairs. The resin heart pendant above cost me only pennies to make so I could easily sell them for $1 at the local Fourth of July festival earlier this month and make a profit. These turned out to be one of my top sellers that day.
If you are new to doing craft shows, the best piece of advice I can give you is to tier price your merchandise. Have several items priced at $1, have several more priced at $5, $10 and so on. The lower end items may sell better, but sales are sales and it is those lower priced items that will attract customers to your space. I noticed that having something that will attract a child's eye, such as these resin necklaces, will do wonders for bringing more people to your space. Just something to keep in mind as you plan your inventory!
Happy Crafting All!
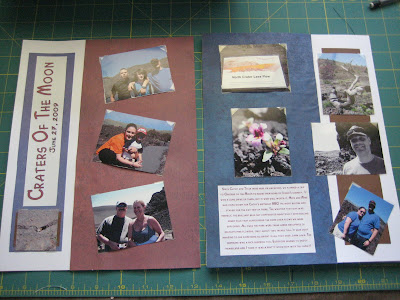 When I was young, there was really only two options for what I could do with photographs: 1) Stick them in a shoebox to keep them safe or 2) Put them into a photo album, which was usually the kind with adhesive and clean plastic covering. Now that I'm older, I know that those old albums are the not best place to store my memories simply because once the picture has been in there a while, it's impossible to get it out.
Scrapbooking and I just don't get along. I have seen some absolutely gorgeous scrapbook pages that showcase a genuine artistic talent. However, I still believe that a scrapbook should be a photo album and I just can't bring myself to spend hours designing a page with $50 worth of embellishments for just one picture. It won't tell the whole story attached to that memory.
Lately, I've found myself leaning toward journaling, which is almost a hybrid scrapbook. Combining the artistry of scrapbook with a little storytelling, the journal saves the complete memory in both images and words.
Showcased above are some simple journaling pages I created for a recent family trip to Craters of the Moon here in Idaho. In mirroring 8"x10" sheets of paper, I was able to place several pictures taken at the park with pictures of the family and a little written reminder of what I loved about the day. I used mostly scrap papers, left over from other projects and was able to whip the pages together in about a half hour. Simple and fast - two things I love in a project!
Happy Crafting All!
So if you did your homework last week, you'll have your supplies. Now is the time to get down to the fun and actually start playing with the material.
Below you can see the material I started with. I chose purple, yellow and teal fabrics with a very subtle print design. The purple will be by Fabric A, Yellow is Fabric B, Teal is Fabric C. For my backing fabric (Fabric D) I chose a cute patchwork flannel print in soft pastel tones.
For right now, Fabric D will get set aside.
 Step One: I highly recommend you wash and dry fabrics. This will take care of any shrinkage and color bleeding that could distort a finished quilt if not done before hand. Once the fabric is dry, iron it smooth. Some quilters like to press their fabrics with a little starch to make them a little stiffer and easier to work with.
Step Two: Cut the following strips:
- Fabric A: 6 strips 2.5" x width of fabric
- Fabric B: 14 strips 2.5" x width of fabric*
- Fabric C: 6 strips 2.5" x width of fabric
(*Set aside 8 strips of Fabric B for the border and binding. You only need 6 strips of each fabric for the blocks.) Step Three: Using a 1/4" seam allowance, sew together one strip of Fabric A to Fabric B. Then sew one strip of Fabric C to opposite side of Fabric B. You end up with a long strip of the three materials approximately 6.5" wide. Repeat the process until you have 6 identical strips.
 Step Four: Turn each strip over and press your seams to the darker fabric. Some quilters prefer to press their seams open. For this project, to keep it simple, just make sure the seams on all the strips go the same direction.
 Step Five: From each long strip, cut six (6) 6.5" fence rail blocks. (Double check the width of your blocks and make sure you end up with squares. If each block is off a little, it will make sewing the blocks more difficult later on.)
 Step Six: Set your blocks aside and relax. Next week we will go over arranging your blocks and sewing them together. I recommend putting your blocks into a gallon size plastic bag that can be sealed to protect them. (I actually like to store material for quilt projects that I am currently or soon will be working on in zip-lock bags to keep them clean and all together.)
I really hope you are enjoying the process so far. Are you excited now that you are seeing the materials you picked out actually joined together? Just think, in a few short weeks, you will have transformed those strips and blocks in a wonderful little quilt!
Happy Crafting All!
 I have always been fascinated with the beauty of wire wrapped jewelry. There is so much skill and artistry that goes into making each piece. One thing I love is the wire tends to have a life of it's own and you can never make the same exact piece twice.
This fascination and my desire to constantly learn new techniques in jewelry making, has inspired me to try my hand at wire wrapped rings. Above is my very first attempt. It's really not very good, but it is simple and wearable. I used half hard 24 gauge sterling silver wire, not the best choice for learning, but that is what I happened to have on hand. The dark green stone (which I think is bloodstone) is accented with simple glass seed beads.
Again, not very fancy, but it looks like a ring which is good. It's always important that your first attempt at something at least somewhat resemble what you were trying to make! I have ordered some less expensive copper wire to practice some new techniques on and can't wait to start experimenting. Hopefully this will inspire some of you to try something new as well!
Happy Crafting All!
 No matter where you are or what time of year it is, it seems everyone knows someone who is expecting. My stepdaughter is expecting her second child in Sept. A co-worker of my husband's just found out they were expecting a little girl. There is always someone, and there is always a need for a gift.
I love to crochet baby blankets for the expecting couples because even though they will probably have a ton blankets of all types, on that was made by hand and with a lot of thought and consideration seems to mean more. Anyone can go and pick up a gift set, but to be able to give a that shows that much time put in to it really makes a statement. More often than not, the crocheted blanket turns into a child's favorite blankie and then a cherished keepsake.
The blanket pictured above is about half finished, but will be a total of four granny squares and a border in white, pink and green. The soft tones will work well in any little girl's nursery. If you don't know if the blanket will be for a boy or girl, or just want to make some to have for future gifts, yellow, green and white also make a great combination.
I'll post new pictures when the blanket is finished. Until then...
Happy Crafting All!
 Last week I showed you a sample of the simple square block to make this lovely quilt. Starting this week, I will walk you through making the quilt pictured above. The whole process should take about 6 weeks to complete. I have broken the process up so that there isn't too much to do each week and you don't end up feeling overwhelmed and frustrated. Plus, I understand that in this day and age, people are busy and can't always set aside a huge block of time for something. The idea is to have each step take only a few hours a week - so if you can block out a half hour a day to work on this, you should not have any problems. A new step will be added every Wednesday until the quilt is finished.
Now down to business....
For the first week, the only thing I am going to have you do is gather your supplies.
You will need:
- Four cotton fabrics, in 44"-45" width
- 1/2 yard each of Fabric A and Fabric C (for blocks)
- 1 yard of Fabric B (for blocks, border and binding)
- 1 1/4 yard of Fabric D (for backing)
- Batting, Crib Size (45" x 60")
- Coordinating Thread
- Rotary Cutter
- Rotary Cutting Mat
- Quilting Ruler (I prefer 6.5"x 24")
- Safety Pins
- Straight Pins
- Sewing Machine
- Iron and Ironing Board
- Comfortable Work Environment
This ends up being about a 40" square quilt, perfect for a new baby. When choosing material, I like to use solids and tonals to keep the quilt from being too busy. Plus, solid cotton fabrics will tend to be less expensive than some of the lovely prints you can find.
When considering your work environment, you will need to be able spread out a bit. I used to sew at the dining room table with my ironing board set up in a corner. Look at your own situation and determine what the best place will be, especially if you are having to set up and take down your work area each time you are ready to sew. Make it as easy and convenient as possible so you don't lose interest in finishing to project.
That's all for this week. If you have any questions, feel free to drop me a line and I will be happy to answer them as best as I can. Have gathering those supplies!
Happy Crafting All!
 When it comes to earrings that can go with multiple outfits and occasions, simplicity really is the key to success. If a person is going to spend money on an accessory, they will generally want to get something that can go with almost everything and accent rather than dominate a look.
These simple drop earrings featuring aqua resin beads accented with teal and white beads lends itself to so many different looks - from a lovely wedding reception dress to summer work outfit. Classy or jeans, most people will love (and feel more comfortable buying) an accessory that will go with everything.
This is a point many jewelry makers need to keep in mind as they are designing their pieces to sell. While it always great to have extravagant pieces that showcase an artist's skills, talent and voice, it is also important to have pieces that a woman can wear on a daily basis. Just a little food for thought.
Happy Crafting All!


