Thursday, October 25, 2012

Owls are a Hoot!

Bad pun, I know, but I have been weirdly drawn to owls lately. Perhaps it's because my grandmother collected them most her life and now that she is gone, they remind me of her. The big eyes always get me, and they are surprisingly simple to try to design.

I decided one day I wanted to make some owls when I needed a project I could take with me. So searching online for cute little patterns, I came across a super cute one here from PregnancyBabyChild.com. They have  the pdf pattern available and instructions for making a mobile. I wasn't that interested in making a mobile, so I just made a few owls.


These were pretty easy and inexpensive - just felt, thread, buttons for eyes and stuffing. I could do them just about anywhere and came together quickly. Overall, very happy with them and actually want to make a few more...

Thursday, October 18, 2012

Dog Cookie Jar

That title may be a little misleading. Let's say this is more of a "Treat" jar, but a lot of people refer to their pup's treats as cookies. And it kinda looks like a cookie a jar.

Anyway, we are going to finish the week with a tutorial on how to make this super easy and very inexpensive  treat jar.


Here's what you need:


  1. Glass jar (I paid $5 at Walmart)
  2. Alphabet stickers ($1.50 at Michael's)
  3. Masking tape
  4. Armour Etch*
Armour Etch is getting hard to find in stores, which is a shame because I love that stuff. It is a quick and easy way to get the etched glass or mirror looks at home. I know you can get it on Amazon pretty easily (along with letter stencils) or try the Walmart website.


The process:

1. Make sure the glass jar is clean and dry. Apply stickers to spell "Treats", "Cookies", or your dog's name. Be sure stickers are completely stuck down, you don't want the etching cream seeping under them. This is totally customizable. Next put masking tape around the area you don't want etched. Again, make sure edges are completely sealed.

2. Apply a thick coat of the etching cream. Cover the letter stickers completely, but be careful not to go past the masking tape. Follow the package directions. (Although I've found that leaving it on a little longer than directed helps the etched look.)
3. Rinse with water. I always try to do one of the sides without stickers first so I can check the quality of the frosted glass look. If it doesn't look even or frosted enough, I leave the cream on and apply more where needed.

4. Air dry to see completed frosted look. Because the outside is etched, you can hand wash the inside as needed.
And that's it. Now all that's left to do is fill it with treats for the pups and you are all done. 

Keep in mind this process is perfect for customization. Use smaller jars for smaller dog treats or even cat treats. Or change the words and use it as a candy jar. Use swirly accent stickers instead of letters and these jars are great for home decor. Once you have the process down, there are really so many possibilities for what you can make!


***Sorry, the pictures for some reason didn't load, but I will get them uploaded again as soon as I can!***

*** UPDATE 11/5/12: Pictures uploaded and working this time! ***

Wednesday, October 17, 2012

Snuggle Pup

All three of our dogs are kennel trained. Well, that's not entirely true. The Dachshund is still in the process of being trained. She's a pup and resistant to the idea of being in a cage. I can't say I blame her. She was abandoned at my vet's office (where my step-daughter happens to work). I believe she is pure bred doxie because her original family had paid more than $700 for her, but then had to move and couldn't take her with them.

She sat at the vets office for a little more than a month, going on three overnight trials to potential families, my step-daughter being one of them. The reasons for not keeping her ranged from "She hid from us and wouldn't come near us" to "Our house is already full, and as small and sweet as she is, we just can't handle a puppy right now." When she came to us for a trial night, her little nose raw from nudging at her cage door trying to get out. After about 20 minutes, we knew she wouldn't be going back.

Mini is a sweetheart - a bit of pain considering she still gets in to everything and will have the occasional accident on the floor - but still a little doll. She loves to cuddle and will jump on your lap to cuddle. I've also learned, like most doxies, she loves to burrow. I think it goes back to the original job of the breed - burrowing in to rabbit and other small animal holes. Yes, Dachshunds were bred to be hunters.

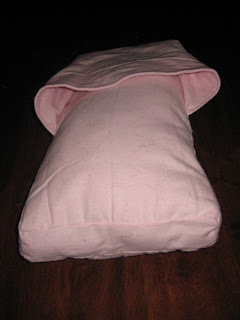
Anyway, my intention for this little bed is to have it stay in her kennel. It has a little "cave" at one end for her to burrow in to and lots of stuffing to make it extra soft. The bed was made from a flannel remnant I found at Walmart. It was just under a yard of material and worked perfectly to make this little bed.

The idea now is to train her, outside the kennel, that it is her bed where she can be safe and comfy. Then move it in to her kennel, which it should fit in to perfectly, so she will be more comfortable in there. Of course that is our plan, but doxies usually will do things their own way so I guess we will just have to see how this all goes. Wish us luck!

Tuesday, October 16, 2012

Scrap Stash Dog Toys

Yesterday I showed you some super simple upcycled dog toys made from old clothes. Today is all about using up scraps of material from your sewing stash. If you don't sew, you could always just look for remnants at your local craft stores. Remnants are a great way to go because you don't necessarily need a lot of yardage to make some great toys for your pup.

All three of these toys were made entirely from scrap material. On the far right is some pink flannel that I had left over from a dog bed I made (which will be another post). Because I only had a couple of small strips, I sewed down the short sides and one long side. Then I divided it in to fourths and made four small "puffs" which were stuffed with scraps of fleece and then sewed the fourth side. The reason for the fleece stuffing is I hate having to pick up regular stuffing that has been scattered all over the floor. This way, should the dogs get this one open, I have a small strip of fleece to toss and that's it.

The middle is four strips, about 22" long, of a one-way stretch fleece, that was knotted at one end, weaved together in a rope and knotted at the other end. The stretch allowed me to add a lot of length to the toy and is great when the Dachshund and Lab mix want to play tug 'o war. (Yes, they do, quite often, and the doxie usually wins.)

Finally, the little gray bone shape is just two pieces of felt stitched together. No stuffing and nothing special. For some reason, the doxie loves to grab the little flat toys and shake them like crazy so that's why I made this one for her.

Monday, October 15, 2012

Up-cycled Dog Toys

This week is going to the dogs. My dogs to be exact. I have three, blue heeler Molly, Norwegian Elkhound/Lab mix Liebe and dachshund Mini. They are all rescue dogs and couldn't be more spoiled in this house. They are all pretty near perfect for our family though. Molly is about four, Liebe is a little over a year and a half and Mini is under a year. The two older are pretty mellow and calm in the house but run like crazy outside. Mini still has a lot of puppy personality and curiosity, but loves to cuddle. And all three are sweet as can be to my granddaughters.

I do like to spoil my pups, but toys can get expensive, especially when the two younger dogs like to destroy them. Then I end up with fluff all over my house. Which is no bueno. As a result, I have taken to making them toys. Nothing extravagant, but something they can pull and tug on without making a big mess.

The first toys were made out of old clothes. The brown is an old shirt of mine. I cut four strips from across the bottom, knotted one end then braided and added a not at the other end. Simple and a great way to reuse old shirts that are stained or outgrown.

The second is obviously denim. I love cutting up old holey jeans for dog toys. This toy is just a section of the pant leg, knotted in the middle. I have also done braided toys, toys made from several strips knotted together, weaves - there really is a lot you can do with denim. What I like is that denim is very durable, it frays but doesn't always just fall apart.

The pups love these and I like that I didn't have to spend money on them! :)

Friday, October 12, 2012

Sewing Like Crazy (pt 3)

This last quilt top needs a little applique work done, so I guess technically, it's almost finished but close enough to share. The inspiration for this design came from wandering around Pinterest. I came across THIS PICTURE and knew it would be a perfect Christmas present for my brother's girlfriend. She collects foxes and I thought this might be a nice addition to that collection.

You can see mine is a bit different from the picture, just in some of the shapes and color tones.The reason for this is I had to figure out the pattern on my own. Afterall, all I had was a picture, no instructions or measurements. I used about a yard of the red, two fat quarters of the off-white beige color and about two yards of the black. The fox is made out of mostly 9" blocks. 

The red sashing was my brother's idea to dress up the empty black space around it. All in all, I'm very pleased with how this turned out and am even considering making another one for myself. If anyone would like a tutorial on how I made the fox, please leave a comment and I will get to work on it!


Thursday, October 11, 2012

Sewing Like Crazy (part 2)

Yesterday I shared an almost finished king size quilt. Today, I go down one size and show you a completed queen size quilt. This one is a Christmas gift for a special young man in my life and I really hope he likes it.

The pattern for this blue and black quilt was adapted from a baby quilt that I shared back in August (and can be seen here). It was pretty simple to adapt the pattern, just a matter of doing some math. Personally, I'm very happy with how this quilt turned out, it is very bold in its shades of blue but still simple enough for a young man to enjoy.

 I used a total of sixteen fat quarters for the main part of the quilt, two of each fabric. Then I believe I used about two and a half yards each of the black and the light blue green used in the long bars and in the borders.

It was pretty simple to put this together, really just a matter of a straight seam, press it, add a straight seam. I think it took me about a day and a half worth of work to get this whole top completed.
Here you can see a little more detail of the fabrics I used. What I love about fat quarters is they aren't really that expensive and you can get some great variations in color and tone. Those variations are what really make this quilt stand out.

Plus, when using fat quarters, you can really mix and match your fabrics to get whatever look you like, without necessarily having to stick to a particular shade or tone.

Wednesday, October 10, 2012

Sewing Like Crazy Lately...

So, if you remember last week, I shared this Shining Quilt with you. It is a Christmas present that I got finished for a special person in my family. Well, all I can say is sewing is pretty addictive. I have since finished two more quilt tops, have one that is almost finished and one that is in the process of being made. Granted they are only tops right now, but tops generally take the longest time with all the piecing involved. 

This week, I want to share some of the sewing I have been doing. I'm going to start with the one that is almost finished. It will be for my king size bed when it's done. Right now all that is left is to figure out a border to go around it to get it up to the right size. My hubby loves the colors in this quilt and the very simple pattern that I used. 

 Sorry the first picture is sideways, but I still haven't quite gotten that figure out. Anyway, right now it is just about the right size for a queen bed, but as I said, I need a good border that will make it perfect for our king.

This one is not a high priority right now just because it is not a Christmas present - it might have been in the hubby didn't see already. But it will get done within the next month or two. I am even considering making it in to a cover for our down comforter, but haven't decided 100% yet.

Below is a close up of the fabrics I used. These have been in my stash for quite a while because I wasn't sure what I wanted to do with them. I was fortunate enough to find some more of the black with the swirly pattern at my local Joann's.

I also have an idea for the back of this quilt that will make it more of a reversible quilt, I just have to sit down and really plan it all out. But for right now, my sewing machine is calling me...


Thursday, October 4, 2012

Keeping Toasty


It's definitely feeling like fall. Too cold for to leave windows and doors open all day but too warm to start a fire. In my house there are always tons of blankets around to help ward off a chill as we relax. I recently finished this lovely and simple throw for the couch. It's made of sixteen granny squares, with a variegated yarn in the center of each to pull all the colors together.


My hubby and I both love the outdoors, my favorite is the coast and water while he loves the mountains and local deserts. So our house is done in warms browns, blues and greens which help up think about the outdoors. This blanket will, I'm sure, be used quite a bit for my brother and his girlfriend to cuddle under during the cold months ahead!

Wednesday, October 3, 2012

Personalized Space

My two little granddaughters share just about everything - toys, clothes, and room to name a few. Right now they are young enough to still be ok with that much sharing, but I'm sure it won't be long before they want their own space.

To help their shared room feel like it can be a bit more personalized and they each have some space of their own, I made them each a name banner. There is one for each girl so her name can be hung above her bed, maybe giving her a feeling of having some space of her own.


They both just got new bed linens and comforters that were black and white with bright pink flowers. My step-daughter wanted their room to be fun and colorful, so when I saw this material I was ecstatic! It fit the theme of the room perfectly and the flower buttons at each end gave them that extra little pop of color.


Tuesday, October 2, 2012

A Shining Quilt

It is roughly 85 days till Christmas. I can't believe it is October already! Everyone here has been so busy that I have no idea where this year has gone. I know I might be jumping the gun a little bringing up Christmas, but I needed to get an early start. (Hey, it's not like I have decorations up or anything! That happens after Thanksgiving!)

We are a single income family and my hubby just changed careers, so Christmas might be very lean this year if I didn't start thinking about it now. It's not that we have extravagant gifts or even mountains of them every year, but we have a large family. Even just getting one thing per person can get pricey - so I started early, picking up one gift here and there and deciding on what I would make for everyone.  And there will be a lot of handmade. The goal was to spread the expense over as many months as I could rather than try to come up with a lot of money and time in December. I don't know about you, but none of my bills can be put off in December, they still have to be paid regardless of the holiday.

So, this is the first hand made gift I've completed of the year. I showed you one block a couple of weeks ago, and thanks to a week of sewing like crazy, I have it finished! YAY! One down, only about four more quilts to finish! The recipient collects lighthouses and loves the coast, so I embroidered lighthouses on blocks and chose warm beachy browns and cool blues.


Getting those blocks framed and set was a pain, but worth it for the overall quilt. I finished it with some basic (crooked) straight line quilting. I don't know that I will do another one like this, layout at least, until I've forgotten how much a pain this was!

Monday, October 1, 2012

"Designer" Jeans

So the weather is definitely turning colder and October is bringing the autumn feeling with it. Before long there will be leaves on the ground, the garden will be emptied and canned and I will look forward to cozy fires to keep me warm.

With colder weather, comes the need to dress warmer and our little granddaughters are the first to get new fall/winter clothes to keep them warm. My oldest granddaughter is four years and built very sturdy. She isn't chunky or pudgy with baby fat. That little girl is muscle and I can see her being a great athlete someday. Right now, it means she has a hard time finding pants that fit her right. So when my hubby and I decided to spoil her with some new clothes, we were not too thrilled to see that girls were offered primarily skinny and slim fit jeans.

So to get the best fit, we had to get her little boy pants. I didn't like it because I thought it might give the little girl a complex, but using my super-crafty skills, I turned it around and made it in to a fun project. Boys jeans are very plain which means that are great for dressing up and personalizing at home.

We started with some plain black jeans, some patches, sequins, Fabri-tac and a silver glitter fabric marker. I let her decide what she wanted and where, added the glue and she pressed them down. I did all the work with fabric marker, but she told me she wanted swirlies and polka dots. So this is what we came up with:


She was so happy with them and everyone else has told her they are cute. I think they really fit her personality. My favorite part of this whole project, it was the first lesson she got in a simple philosophy: You don't have to spend a ton of money to have clothes that will help you stand out!